

OK. As far as I can tell no-one on the planet that owns an Mk3 Focus has custom gauges installed...except this guy. [woot]
I contacted Black Cat Custom after another FF member posted that he had discovered that they were offering custom gauges for the Mk3. I jumped at the opportunity to get some and invited a friend along for the ride.
I custom designed, using their template, a unique gauge face that would compliment our cars and the colors we utilized to personalize and mod those cars.
I'm extremely happy with the communication, professionalism, and the fact that Black Cat Customs put up with me changing something with the design at least 1325 times. No less than that. [facepalm]
After nailing down what we wanted our gauges were made and shipped to us in about 2 weeks.
HOW TO:
The first thing you'll want to do is remove the shroud that is above the steering column. It snaps out pretty easily.
![Image]()
![Image]()
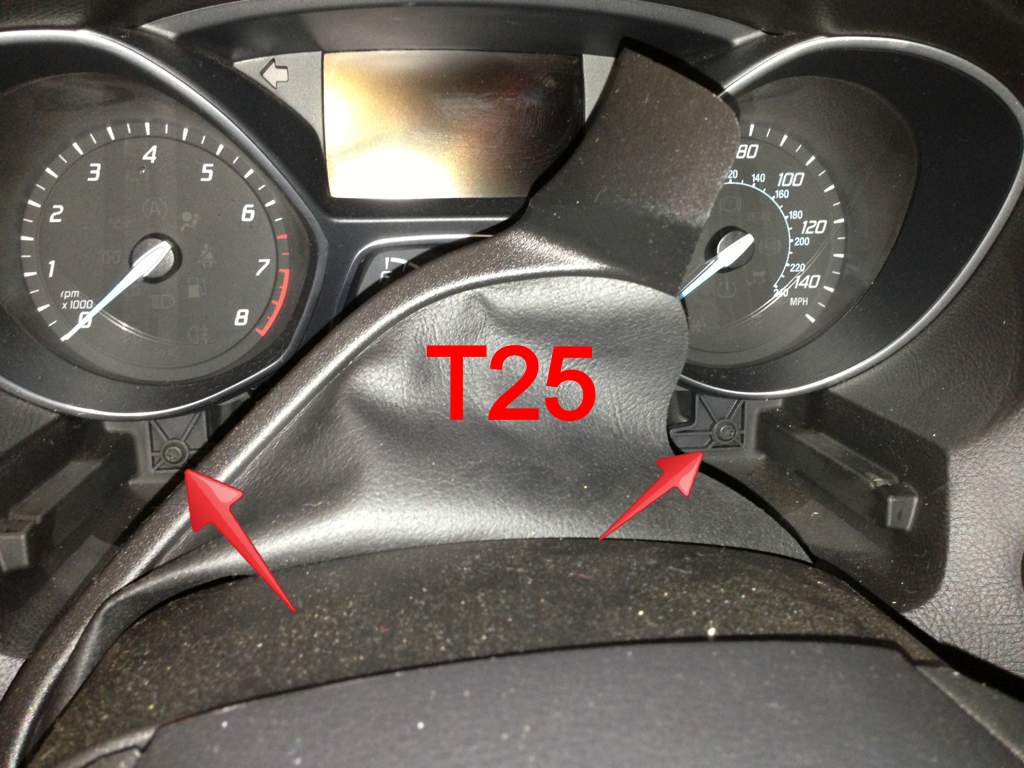
Once that is out you'll remove two torx screws, indicated by the arrows.
![Image]()
You'll hear some scrapping and, quite frankly, it'll sound like your breaking something as you pull out the instrument cluster. You're not.
There is a metal tab that scraps along a plastic ribbed piece, shown in the pictures below. So keep pulling.
![Image]()
![Image]()
The only thing holding the instrument cluster in is the wiring harness. Reach behind and find the latch indicated by the arrow. Pull it to the right and then down. Now pull the harness out.
![Image]()
You'll notice that the there are a bunch of tabs to separate the instrument cluster. Carefully work them from left to right, or if you're daring, right to left.
It'll eventually come apart into 4 pieces as shown.
![Image]()
You'll want to mark the cluster, as shown, in order to preserve your needle position.
![Image]()
Meow - pick a needle and get to work. Carefully grasp the needle and, turning counter-clockwise, pull up. Keep turning and applying upward pressure to remove the needle.
You'll notice two small white tabs holding the gauge face in. Press in on those and remove the face. Insert new one. Simply press the needle down, using the BASE of it, until it is flush.
![Image]()
YOU WILL need to tweak the needles. I kept the plastic "case" off the cluster and plugged the gauges back in and adjusted the needles until they were were they were supposed to be. Fret not young one (or old [dunno]) you'll get it. [thumb]
Once you've got them back to where they need to be. Disconnect the cluster, re-attach the housing, and re-install.
Push it back in, insert the two torx screws, and then snap the shroud back in place. Enjoy. [twothumbs]
![Image]()
![Image]()
![Image]()
![Image]()
As always, if you've found this thread helpful, rep a brotha! [thumb]
PM me for contact details about Black Cat Customs as I'm not sure if posting their information violates any rules.
I contacted Black Cat Custom after another FF member posted that he had discovered that they were offering custom gauges for the Mk3. I jumped at the opportunity to get some and invited a friend along for the ride.
I custom designed, using their template, a unique gauge face that would compliment our cars and the colors we utilized to personalize and mod those cars.
I'm extremely happy with the communication, professionalism, and the fact that Black Cat Customs put up with me changing something with the design at least 1325 times. No less than that. [facepalm]
After nailing down what we wanted our gauges were made and shipped to us in about 2 weeks.
HOW TO:
The first thing you'll want to do is remove the shroud that is above the steering column. It snaps out pretty easily.


Once that is out you'll remove two torx screws, indicated by the arrows.
You'll hear some scrapping and, quite frankly, it'll sound like your breaking something as you pull out the instrument cluster. You're not.
There is a metal tab that scraps along a plastic ribbed piece, shown in the pictures below. So keep pulling.


The only thing holding the instrument cluster in is the wiring harness. Reach behind and find the latch indicated by the arrow. Pull it to the right and then down. Now pull the harness out.

You'll notice that the there are a bunch of tabs to separate the instrument cluster. Carefully work them from left to right, or if you're daring, right to left.
It'll eventually come apart into 4 pieces as shown.

You'll want to mark the cluster, as shown, in order to preserve your needle position.

Meow - pick a needle and get to work. Carefully grasp the needle and, turning counter-clockwise, pull up. Keep turning and applying upward pressure to remove the needle.
You'll notice two small white tabs holding the gauge face in. Press in on those and remove the face. Insert new one. Simply press the needle down, using the BASE of it, until it is flush.

YOU WILL need to tweak the needles. I kept the plastic "case" off the cluster and plugged the gauges back in and adjusted the needles until they were were they were supposed to be. Fret not young one (or old [dunno]) you'll get it. [thumb]
Once you've got them back to where they need to be. Disconnect the cluster, re-attach the housing, and re-install.
Push it back in, insert the two torx screws, and then snap the shroud back in place. Enjoy. [twothumbs]


As always, if you've found this thread helpful, rep a brotha! [thumb]
PM me for contact details about Black Cat Customs as I'm not sure if posting their information violates any rules.


