Focus Fanatics Forum banner

Philips DRL Install

62K views 83 replies 32 participants last post by  tincu  
#1 ·
A lot of you have been asking and patiently waiting for this write up. Hope it helps.

I removed the splash panel under the car:
Image


By removing these 10 screws (torx bit) and 6 plastic push pins:
Image


I also removed these 4 push pins on the cover that sits over the radiator. It doesn't have to be removed, but it allowed me to lift the rear edge up so I could run the wires from the passenger side DRL underneath it to the driver's side:
Image
 
#2 ·
I also removed both headlights to make it easier to run the wires. There's 2 torx bit screws that hold the housings in place. The one with the red arrow is at the front and there is another identical one at the rear of the housing (not pictured):
Image


I then unplugged this connector and placed the headlights out of the way until I reinstalled them later (driver's side shown):
Image


Before I get too much further I wanted to show you this picture, which shows the easiest place (as far as I could tell) to mount the DRLs. The lights seem like they were made for this location and literally fit in the gap like a glove. With a little double-sided 3M tape all you'd have to do is finish the wiring and you'd be done. I estimate that this route would reduce the install time by a factor of 10. I guess it's just a matter of how much work I wanted to do, and how badly I wanted them mounted where I ultimately put them:
Image
 
#3 ·
This is what I saw when looking from underneath the car. I carefully pried these clips until the grille panel could be removed. I guess I should mention that I had the car up on jack stands for this project:
Image


This is what you're looking at in the first photo, from the front of the car:
Image


Here's the panel removed from the car. I used a Sharpie pen to trace the outline of the front of the grille so I had a rough idea how large I needed to cut the rectangular-shaped hole (the DRL housing is roughly the same height of the opening, as you will see later):
Image


Here's the front grill with the rear panel removed:
Image


Here's the hole I cut, using the DRL itself as a guide as to how large it needed to be. I ended up having to continue to trim it to make it longer so the housing fit properly (final hole size is NOT shown):
Image
 
#5 ·
This is the mounting bracket that came with the kit. I eventually ended up not using them altogether. The DRL lights actually fit perfectly between the horizontal grills without the bracket (imagine the DRL itself installed exactly where the bracket is now). Notice the rear panel has been reinstalled. I should mention that I originally wanted to mount the lights in the grille opening directly above the one shown here. Problem is that the uppermost section of the grille gets smaller on the left side, making this impossible without some serious cutting:
Image


Here is a closeup of the light installed in the driver's side grille from above. I used double-sided 3M tape on the top and bottom of the light to keep it in place. This required a LOT of patience as there wasn't much room to work with to position the light properly without the tape sticking to everything it touched. Ultimately, I put the light in place with the tape stuck to the housing but with the red linings intact where it made contact with the grille so I could still slide it in. Then I removed the tape. This was NOT easy and very time consuming. Note that the light is angled slightly toward the center of the car. This is because the the grilles are at an angle and I wanted to get the lights pointed as parallel to the car and the road ahead as possible. It's not perfect, but pointing them any further inward looked bad. As it is, the lights are brightest at a slight angle to the front of the car (as you will see in future pictures):
Image


Here's the driver's side:
Image


And the passenger side:
Image
 
#6 ·
Here's the mounted light from behind the passenger grille. I zip tied the wires to the mounting stud on the housing to act as a strain relief. Notice the path of the wires to the topside of the car:
Image


To get the wires from the bottom of the car to the top where I could route them to the battery, I used a straightened coat hanger and poked it down toward the ground (passenger side shown):
Image


Here's the coat hanger from the bottom of the car. I duct-taped the wires to the coat hanger and then pulled it up from the top:
Image


I then carefully routed the wires using zip ties along the way, eventually ending up next to the battery where I mounted the DRL control unit:
Image


I cut a hole into the side of the battery compartment using a unibit so I could route the power wire to the battery. I did not connect the ground wire directly to the battery, but to a grounding point next to it (not shown):
Image


I used a grommet to make it look like it belongs there:
Image
 
#7 ·
Here's the finished product:
Image


Notice how the lights are the brightest from a slight angle. They're still plenty bright from dead ahead, but definitely brighter when viewed at a right angle to the light itself. Although it wasn't my intention, I suppose this isn't necessarily a bad thing because it gets the attention of other driver's that may be stopped on a side road ahead, or at an intersection.
Image

Image


Since this mod was all about visibility (okay, I admit they look pretty cool too) I think it does a pretty good job. And I don't have to remember to turn my headlights on all the time, and I can just leave the headlight switch on AUTO and leave it alone.

Here's a picture of the car at a distance with the DRLs off:
Image


And with them on:
Image
 
#8 ·
The way the lights work is they sense the voltage increase when you have the engine running and they come on automatically. They shut off a few seconds after you shut the engine off.

The kit also has a wire you can optionally hook up to the low beams or parking lights (I'm not sure which works, either might work just fine) so when you turn your lights on the DRLs will shut off. Right now I have them on all the time but I plan on hooking the wire up to my low beams so when my headlights turn on they will shut off.

The pictures don't do the lights justice. In person, they're a very crisp, white light. I'd say they look no different than the DRLs that Audi uses.

Tony
 
#11 ·
Tony, thank you so much for posting this detailed account of your install! My kit just arrived from PowerBulbs on Wednesday, and I am looking forward to tackling this project tomorrow morning! I pulled them out of the package to do a dry fit, and I am going to abandon the brackets, too, since the light units appear to fit just perfectly in the opening without them. Based on your experience, do you see any reason why you couldn't just use double-sided tape on the bottom instead of on both sides? Did you use any automotive-specific type of tape? I have some permanent 3M foam double-sided tape. Any reason why that might not work?

I believe if you connect the other wire to the parking light wire, they will shut off when the parking lights come on, but if you connect it to the low beam wire, they will stay on with the parking lights but go off with the low beams. With auto headlights, this would only make a difference if you manually turned on the parking lamps.

PowerBulbs also sent me those free sidelight bulbs. I tried to delete them from the order but couldn't. Are these the same bulb that could go in place of the amber parking lamp at the top of the headlight module (but would be clear obviously)?

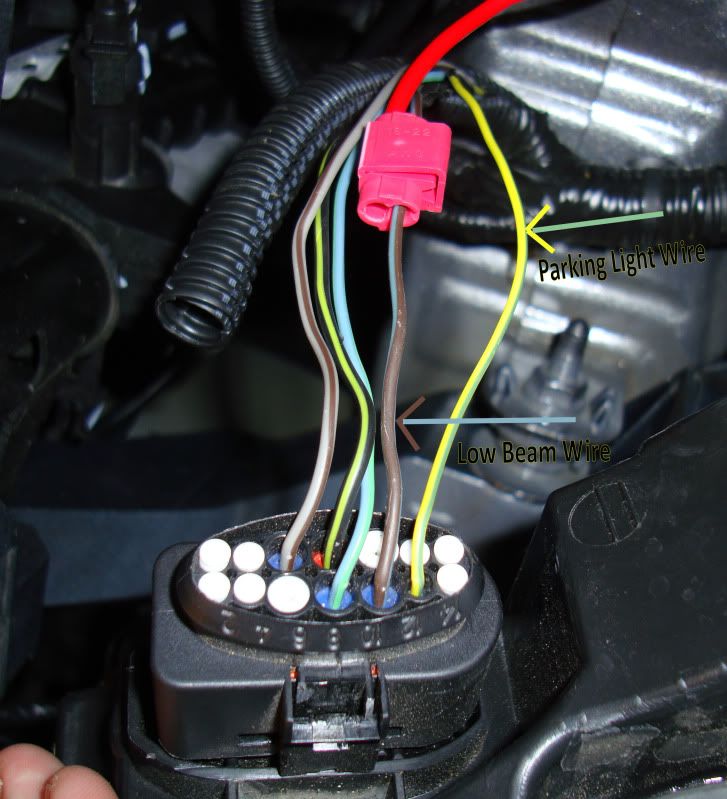
Did you happen to identify the parking light and low beam wires (by color) on the headlight wire connector?
 
#17 ·
I supposed you could use the tape on just one side if you wanted. I did both just to be sure. I was also worried about theft, and with both sides taped it would take a little longer for someone to pry them out. Yes, 3M double-sided tape should work, it doesn't have to be automotive specific as long as whatever size you have works.

I ditched the free bulbs.

As far as the parking/low beam wire, it would probably work best for me to use the low beam. I hardly ever use just the parking lights, and if I did I would want the DRLs to stay on. By hooking the wire up to the low beams I would be assured that any time the lights were on (when it's dark I assume) the DRLs would be off. I haven't identified the wires yet. This is on my list of things to do.

Tony
 
#18 ·
I suppose one could do this if they were better at making a clean-looking seal with silicone than I am. I'm not, so I didn't. LOL I'm not a big fan of silicone to hold things in place. I use it extensively in audio installs though to fill up holes and stop air leaks. Tape seemed less messy and easier, for me.

Tony
 
#20 ·
After washing the Focus tonight I got unexpectedly inspired to hook up the orange wire from the DRL main unit to the low beams so they go off when the lights come on.

The yellow wire with the green stripe is the parking light wire.

The brown wire with the blueish/gray stripe is the low beam wire.

I simply tapped into the brown wire, used an inline 10A fuse, and electrical taped the connections and that was that. Works perfectly. When I turn on the parking lights the DRLs stay on, but when I activate the low beams (manually or on AUTO) the DRLs turn off.

Image
 
#21 ·
I installed them yesterday and am thrilled with how they turned out! I still keep trying to check them out anytime I pull up behind a car in traffic or happen to drive toward a glass wall (like in a parking lot or something). Here's a quick pic. As Tony remarked in his original post, the pics don't do the lights justice. They are very white and bright. I suppose I should have waited until it was overcast to take the pic.

Image


On the install, I did a couple of things slightly differently. I only used double-sided tape on the bottom of the lights and not on top. They seem perfectly secure. I also ran the wire from the passenger side over along the inside of the lower air dam instead of routing the wire up and going over the radiator. I then ran the wires for both lights up toward the battery area where I had the control module mounted.

Removing the plastic liner piece and cutting the hole in it to accommodate the lights was way more challenging than I expected. Just took a lot of cutting, test-fitting, cutting, etc. Those clips holding that piece on were also very hard to release--even using a screwdriver wrapped in cloth to get leverage.

Tony beat me to it, but I was going to post that the green/yellow wire was the parking light wire. I used an electrical meter to determine which wire was live on the inside of the headlight module because I could not figure out how to release the wiring harness. Any tips from anyone for future reference?
 
#22 ·
Just got finished installing my cheap knock off version, and I thought I would throw in a tip...

Instead of pulling out the bottom wind dam and working from the bottom, the triangle panels just pull out of the front bumper valance. I had to use a plastic wedge to unclip them, but it was MUCH easier than trying to take out the back panels while attached to the car. I don't know how you guys did it!!!

My knock off were a little taller, so I installed them one louvre down.

Image
 
#45 ·
Tony,
Great job on the install.
I work for Philips Automotive and I am responsible for all DRL in North America. We are in the process of launching the DRL8 and DRL4. The Euro version you have will not be available in US.

You sure did do a very detailed documentation of you install. May we get permission to use your photos and some text on our Facebook page and in some other media? The other thingI am working on right now is applications like this with Ford direct. They are interested and although it is a slow process we hope to see our DRL at every Ford dealer next year. The lights can be purchased on Amazon right now. Visit our FB page at http://www.facebook.com/pages/Xplor...lore/111708742235758?ref=nf#!/pages/Philips-Automotive-Lighting/224325367598588 and DRL info at http://www.daylight-led.com/daylight/.

Feel free to contact me with any questions.
Mike Woloson
mike.woloson@philips.com
248-303-3285
 
#47 ·
Go to our Facebook page http://www.facebook.com/PhilipsAutomotiveLighting
and see a post I just put up about my new 2012 Ford Fusion with 3 sets of DRL4. This is an actual car that I loaded the picture up to our web site http://www.daylight-led.com/daylight/
From this site you can "test out" a set of lights on a picture of your car.
Ford is big on our list but as many of you may know it is a VERY slow process to get in at the dealerships. I am confident it will happen, just don't know when.